In order to effectively convey information and ideas, it is important to have a well-written introduction. A good introduction should grab the reader’s attention and provide a clear and concise overview of what the reader can expect to learn from the content that follows. Whether you are writing an essay, a report, or a blog post, a strong introduction is essential to engaging your audience and encouraging them to continue reading. In this article, we will explore some tips for writing effective introductions that will help you to captivate your readers and make the most of your content.
Valorant’s Sentinel role plays a key part in safeguarding a team’s objectives, and no one does this better than Killjoy. This agent’s defensive skills are unmatched by others on the roster due to her innovative setup placements. She is a highly acclaimed inventor from Germany whose arsenal of gadgets and technologies is unmatched. Killjoy’s unique abilities offer exceptional control and deterrence with her setups, making her an indispensable asset in Pearl Map’s two-site, three-lane battlefield.
Killjoy can establish a powerful defense that will leave competitors perplexed through strategic placement and usage of her gadgets. Here, are some comprehensive guide to optimizing Killjoy’s defense of Pearl map with tailored setups that give players an advantage on Pearl map in Valorant.
Related: Valorant: Best defensive Killjoy setups for Ascent map
All defensive Killjoy setups on the Pearl map in Valorant
A Site Defensive Setup (Early Detection and Anti-Plant)
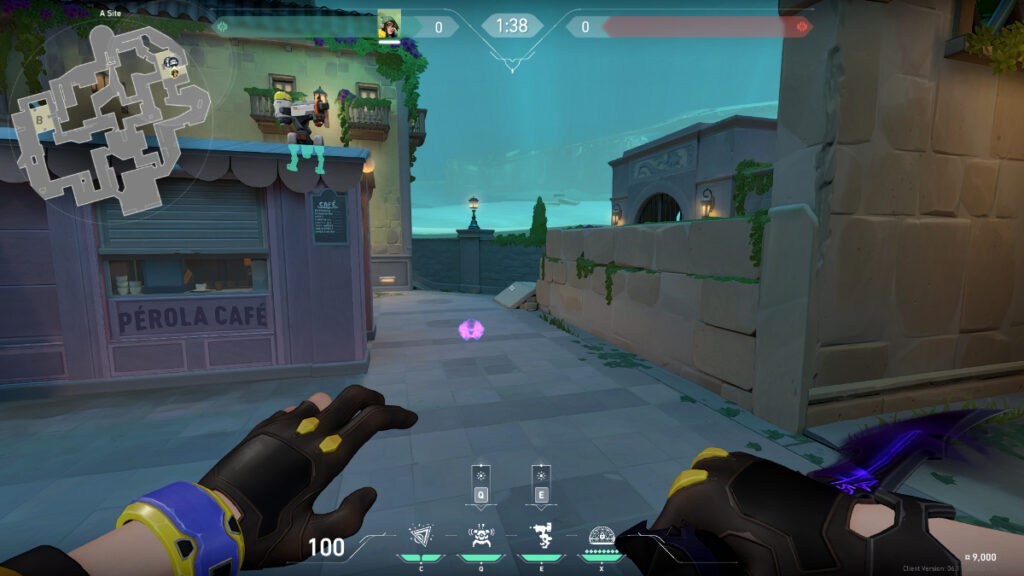 Image via Riot Games
This particular setup presents a substantial advantage during the initial rounds. It successfully obstructs any efforts to plant within the default plant regions of A Site Pearl. It appears that a feasible spot for placing your Turret is on the roof of the café hut that is in the center of the site. Although this may seem evident, it is important to be careful since it could easily attract enemy attention. Nonetheless, this location provides coverage for both A Main and A Link while also enabling quick spotting of opponents.
Position the Alarm Bot between two adjacent walls on the right-hand side. Placing it here ensures comprehensive coverage and rapid identification of any aggressors that enter the vicinity. Plus, with its doubled attack power against detected enemies, this bot further strengthens your defenses.
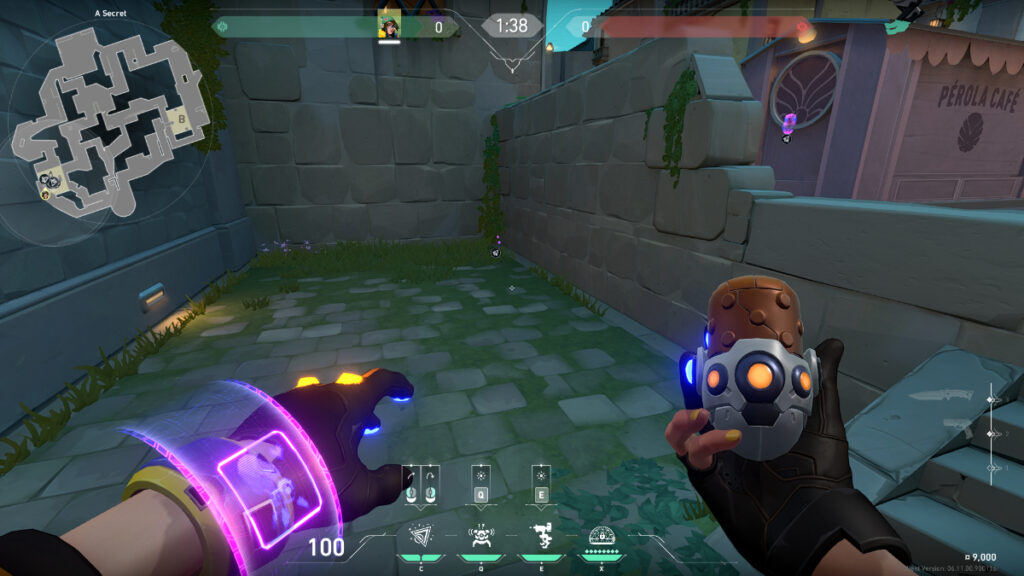 Image via Riot Games
Place a hidden nanoswarm grenade that will stop the plant. When you detonate this tactically positioned Swarm Grenade, its coverage extends to reach the radius of commonly used planting areas. The attractiveness of this grenade lies in its inconspicuousness, making it less likely for your opponents to detect and destroy it in the initial stages of engagement.
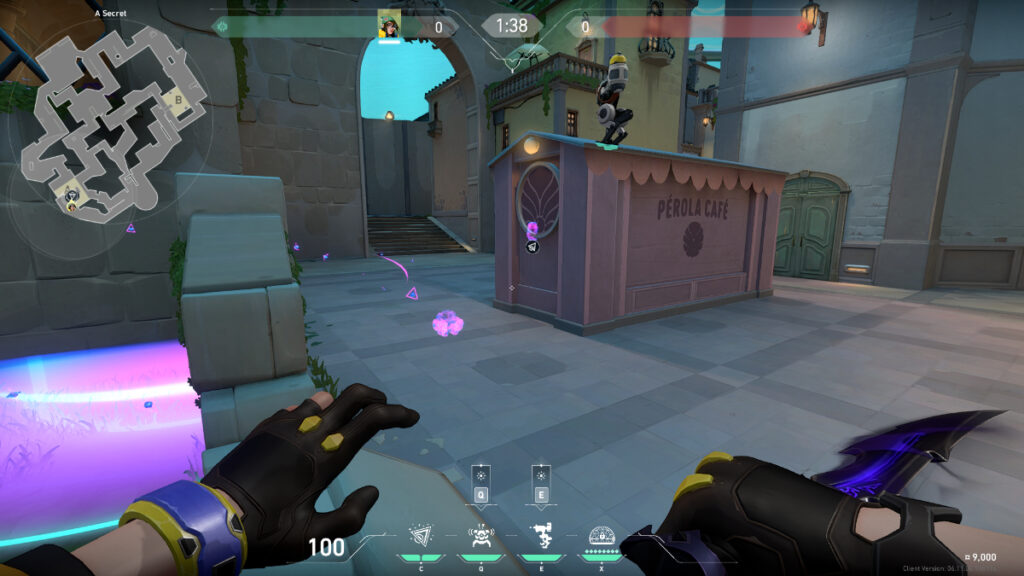 Image via Riot Games
To effectively place your Swarm Grenade, consider positioning it in the corner of A Dugout. This strategic placement will cleverly conceal the ‘pink circle’ of the Grenade from your opponents, keeping it hidden deep within the ground.
By putting this strategy into action, you can make the opposing team delay the plant. This tactic provides you with the opportunity to create extra harm to your enemies by sneakily placing the Dugout Swarm Grenade while also utilizing the Alarm Bot in combination. The pistol rounds prove exceptionally suitable for implementing this setup. It’s important to remain watchful and capitalize on these favorable moments to gain an advantage over the opposition.
A Site Defensive Setup (Dugout Control)
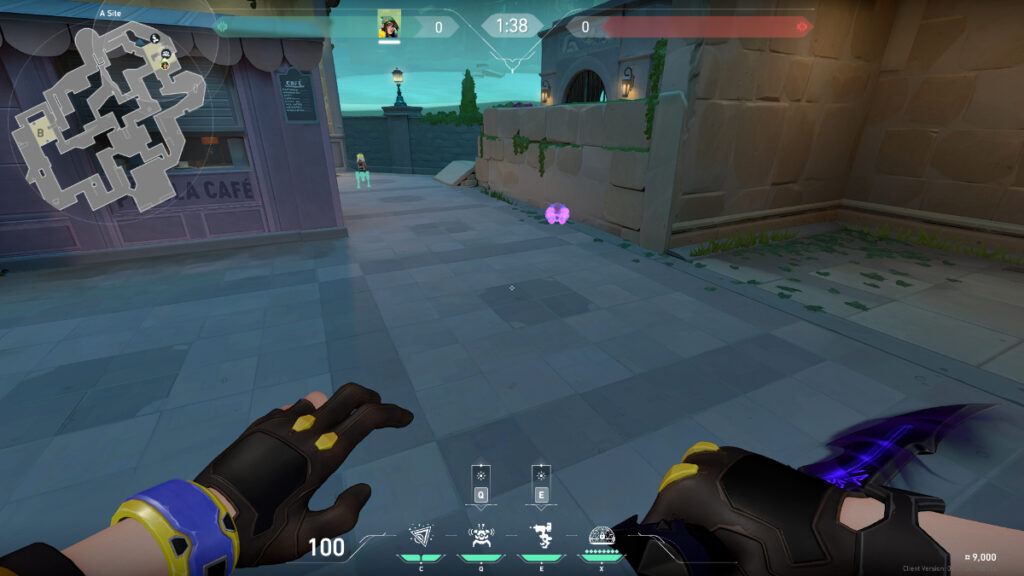 Image via Riot Games
This setup will give you full control of the Dugout and prevent any plants nearby. To keep the enemy at bay and stop them from planting a spike at A Site, consider positioning your Turret cleverly near the green building in the back corner. With this placement comes added security when combined with other abilities like Killjoy’s Alarm Bot and nanoswarm Grenades. While this location does effectively conceal it from enemy firepower, remember that its range does not extend past Mid.
It is recommended to place your Alarm Bot strategically to detect enemies. This will provide an added layer of security for this area. Nevertheless, you should be cautious because this setup may leave Mid or flank unprotected. Beware that the turret also can be smoked off easily. Thus being adaptable would be essential in maintaining a strong defensive line.
 Image via Riot Games
Position yourself in the corner of the opposing wall adjacent to A Dugout. This ensures a clear line of sight toward the window sill. Right-click to throw the grenade. This covers the Dugout and gives you an advantage as it is kind of hard to spot.
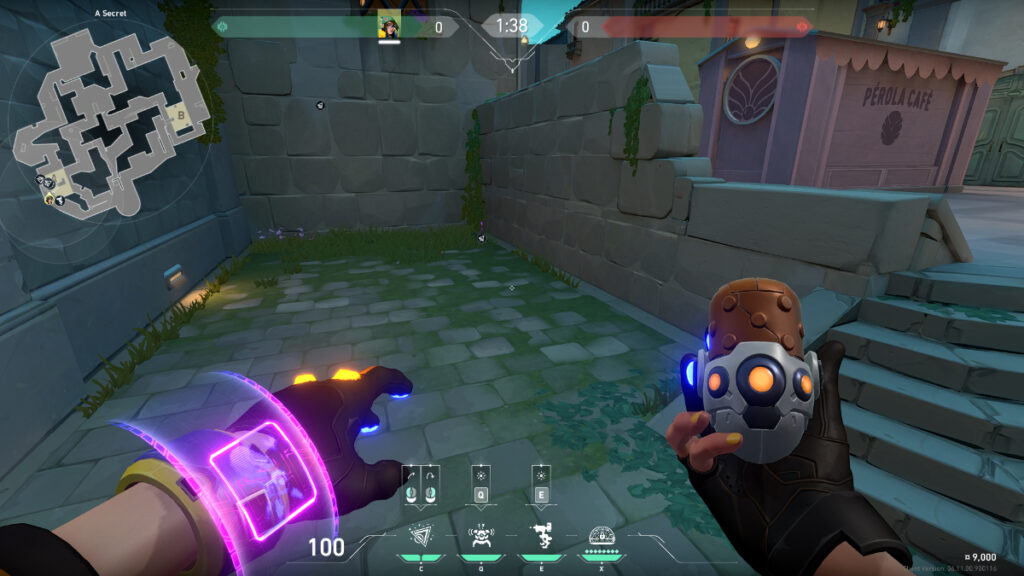 Image via Riot Games
To truly excel in using a Swarm Grenade, position it strategically in an ideal spot: A Dugout’s well-placed corner. Its signature pink circle will not be visible and opponents might walk in easily.
The plan involves targeting A Dugout with the nanoswarm Grenades. To enhance effectiveness, both Swarm Grenades could be utilized together. One possible strategy is to place the first Swarm Grenade on the window sill as a lure that might convince foes that planting is secure once it explodes. This can make it easier to detonate the second Swarm Grenade in A Dugout which would then prevent opponents from planting in their usual location by the wall.
A Site Defensive Setup (To Prevent Mid Push Through A Link)
 Image via Riot Games
If you want to win against an aggressive push coming from Mid and through A Link, all while maintaining a firm grip on A Main, then this particular setup should be your go-to choice. To optimize your gameplay strategy, consider positioning your next Turret in the right-hand corner. This location should be chosen with care so as not to attract attention. By delaying its detection, you can engage with a tactical advantage as enemy movements are hindered and their aim becomes less accurate. Moreover, this spot offers optimal surveillance of any opponents approaching via A Link from Mid.
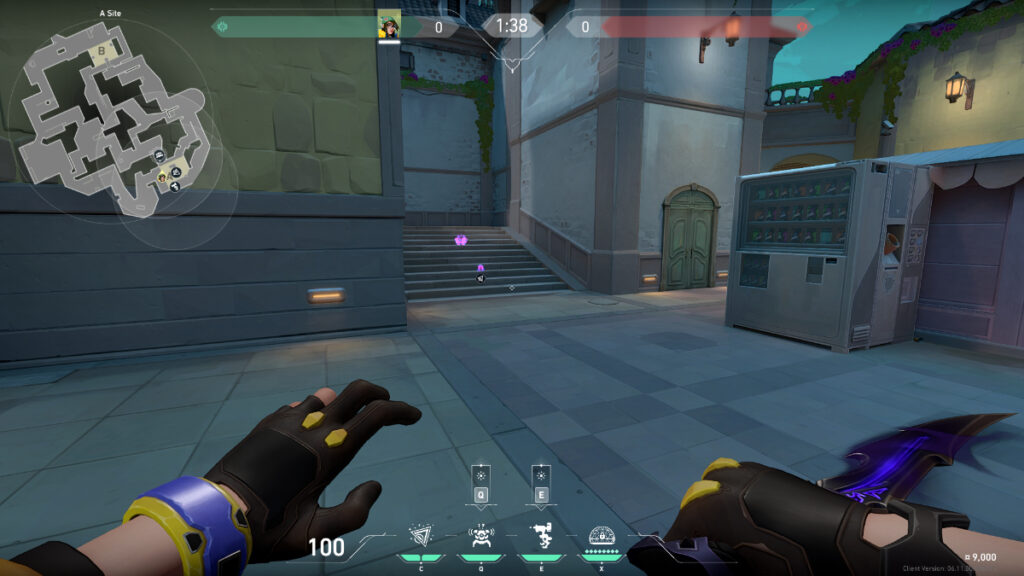 Image via Riot Games
Position the Alarm Bot on the A Link Stairs. Its camouflage can be enhanced by placing it further down the stairs, making it less likely to get detected and more difficult to dismantle. Positioning your Swarm Grenade on the A Link stairs can give you an advantage, especially when combined with the Alarm Bot.
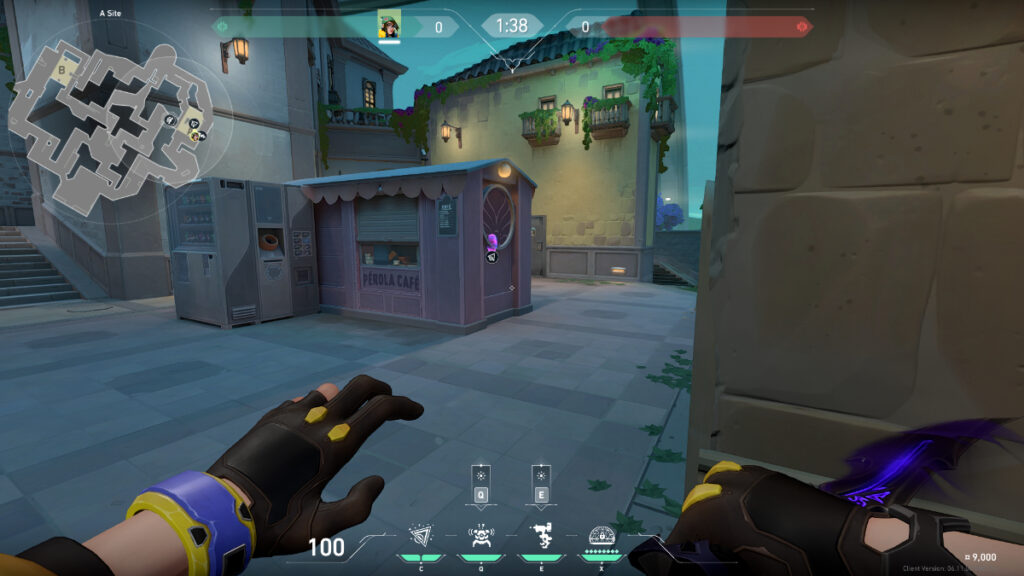 Image via Riot Games
To stop the enemy’s planting attempts, consider deploying a nanoSwarm Grenade in this amazing location. Trigger it with care to effectively render commonly used planting areas within its extended reach. One of the key advantages of this tool is its low-profile nature, which minimizes the possibility of your opponents detecting and destroying it during the early stages.
If the opponents manage to enter the Mid area, they will encounter many obstacles in planting their explosives. They may either choose to suffer through the damage, pause until the Swarm Grenades have detonated, or search for a different spot to set up their gadgets.
B Site Defensive Setup (For B Main Push)
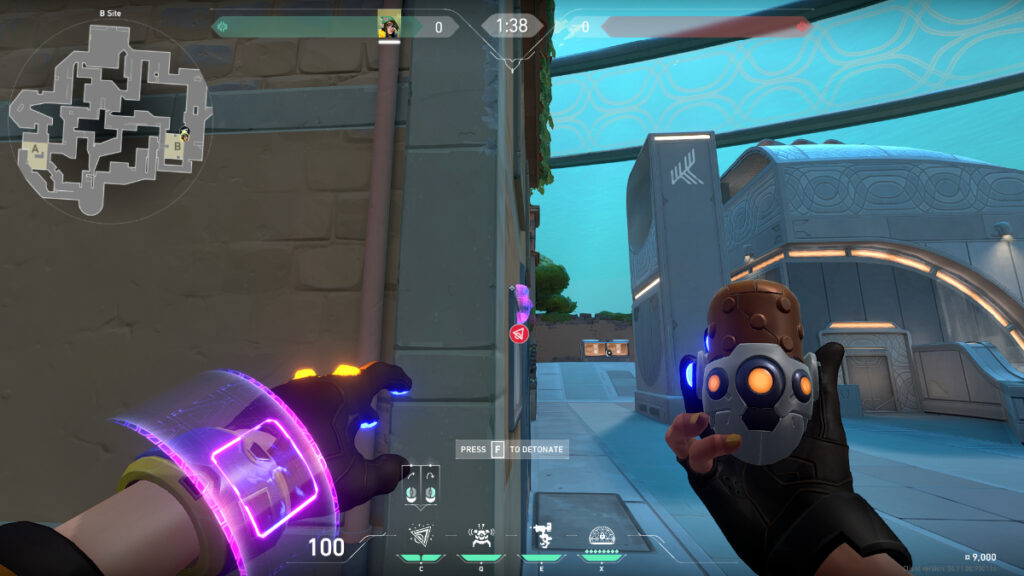 Image via Riot Games
This Killjoy setup will help you stop the enemies from pushing B Main on Pearl. It will slow them down so that your teammates can rotate and help you out. Begin by stepping away slightly from any nearby walls so that you have full visibility. A gray stripe may be spotted at ground level, use this feature as a guide. Two dark dots within the stripe will help you figure out where to position yourself precisely before throwing the Swarm Grenade with a well-timed right click. This technique keeps your opponent guessing and is quite resilient on the field – even when under attack.
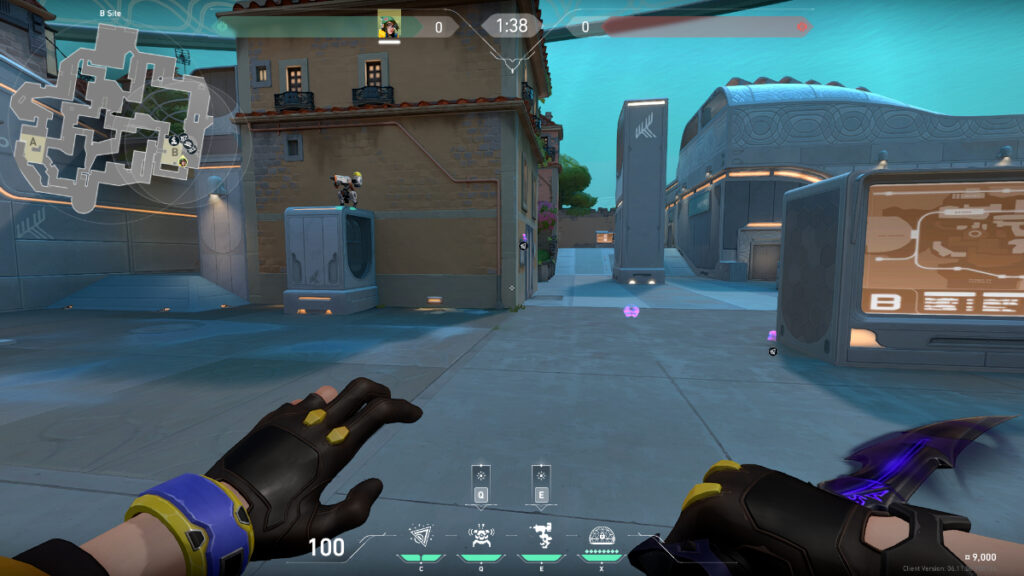 Image via Riot Games
This defensive strategy for B Main that works wonders involves placing an Alarm Bot up front and hiding a Turret behind a large generator outside the immediate line of sight. You’ll also want Swarm Grenades for complete coverage over all entry points for opposing forces.
As soon as an enemy comes into this area, your Turret springs into action slowing their progress and dealing damage, causing them some interest in dismantling it, taking the focus off of your team. Alarm Bot will detect hostile presences and become much more manageable while simultaneously increasing damages received by opponents nearby.
B Site Defensive (To Delay Push And Plant)
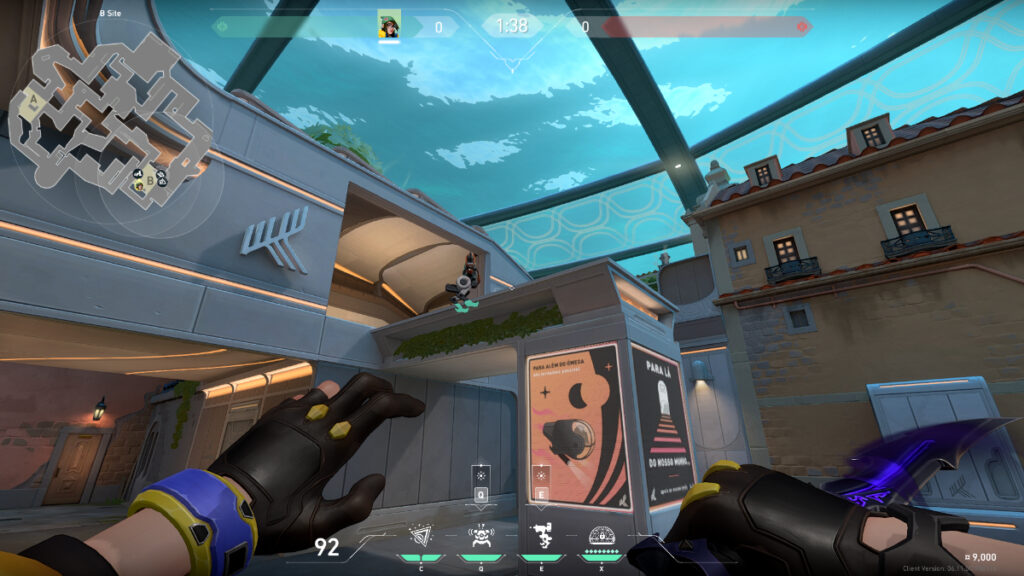 Image via Riot Games
This Killjoy setup will help you slow down the enemies from pushing Pearl B Main. It will also delay the plant with the help of a lineup. Killjoy’s Turret on a higher level will give you an advantage. This point provides the system with an unobstructed view of potential opponents entering through B Main or B Link. Once spotted, their aim becomes disrupted, and the likelihood of them deploying a smoke to obscure the Turret is minimal unless they have a specific reason to anticipate its presence.
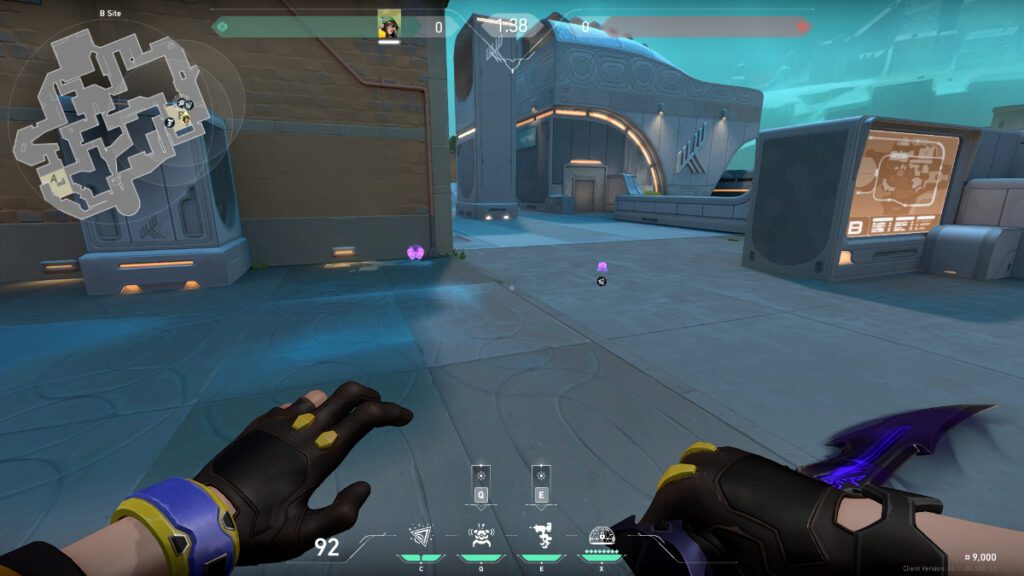 Image via Riot Games
Place the Alarm Bot next to the wall. Once it detects the enemy’s presence during their approach from B Main, it inflicts twice the usual damage upon them. Take advantage of this opportunity by detonating your initial Swarm Grenade right at the entrance of B Main.
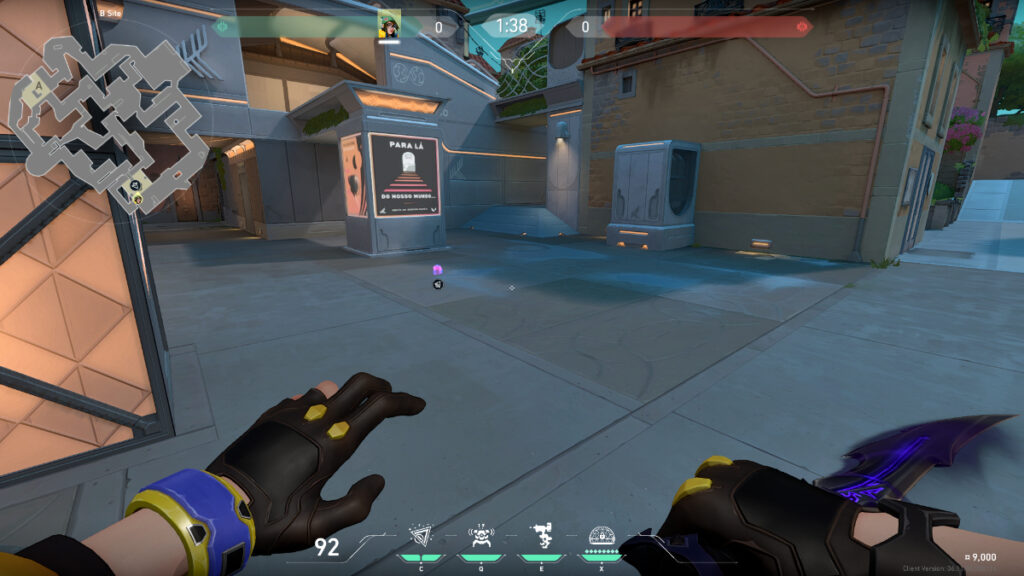 Image via Riot Games
To further obstruct the enemy’s plans, utilize your second Swarm Grenade for a lineup that will stop them from planting. This lineup will land on a commonly used planting spot which will deny the plant.
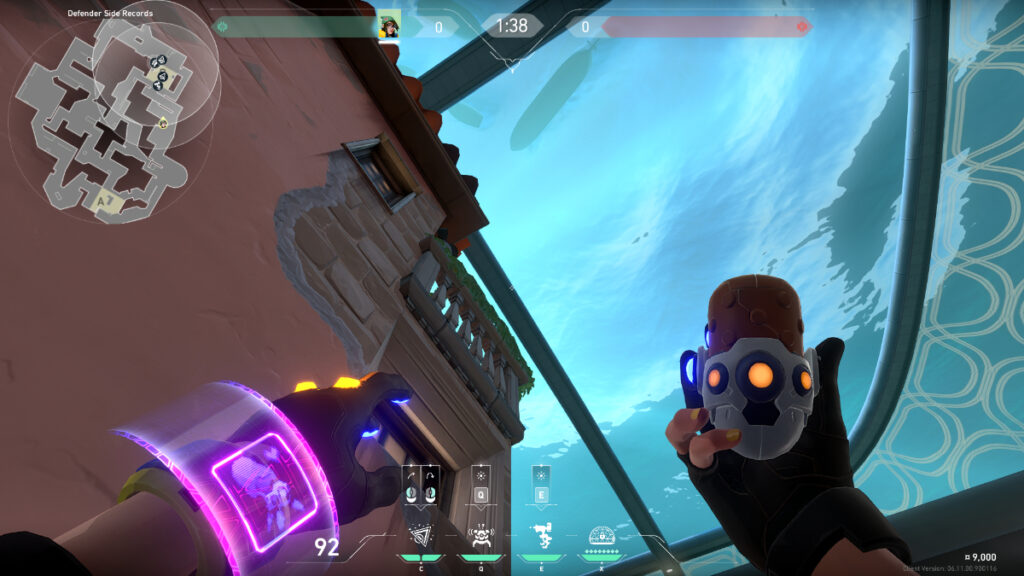 Image via Riot Games
If you want to try these lineups, head to Defenders’ Side Records area, where two wooden boxes can be found. Place yourself at a suitable vantage point in between them and observe closely at the railing above which has dark stripes running along its length. By counting two poles from your right and following its dark lines up till they match those of an aquarium nearby, you’ll have found your target location for launching one of two effortless moves – either jump or regular throws with distinct target sites on B Site.
B Site Defensive (for Early Detection and Delaying Default Plant)
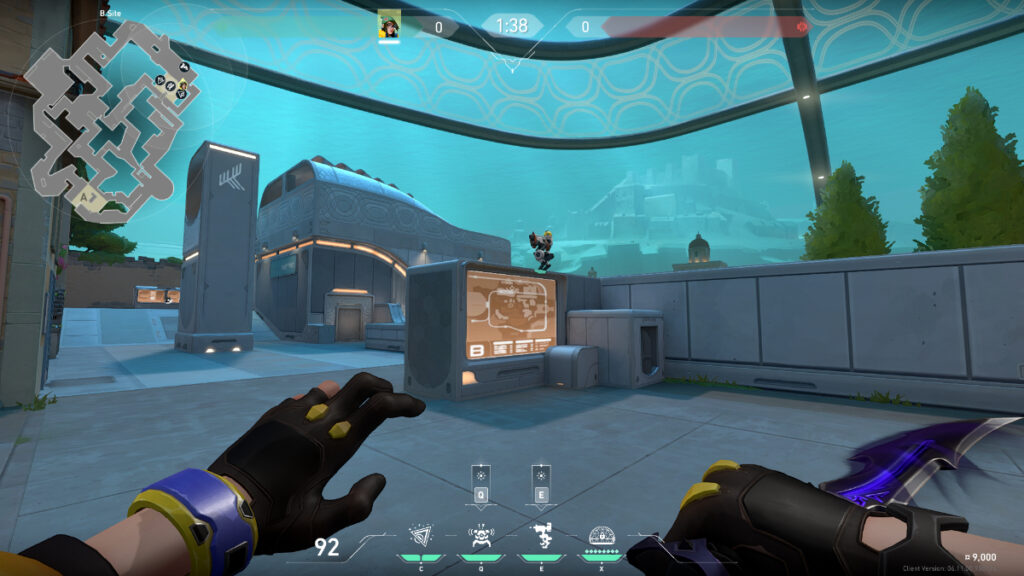 Image via Riot Games
This setup will help you detect the enemies early in the round giving you an advantage. It will also delay the plant at two commonly used stops. When you need information, make use of this Turret. Placing it on top of the box with what seems to be a map image will catch the attention of attackers early on, even though they’ll likely destroy it but you will get the information you need. After this, you can alert your teammates and play accordingly.
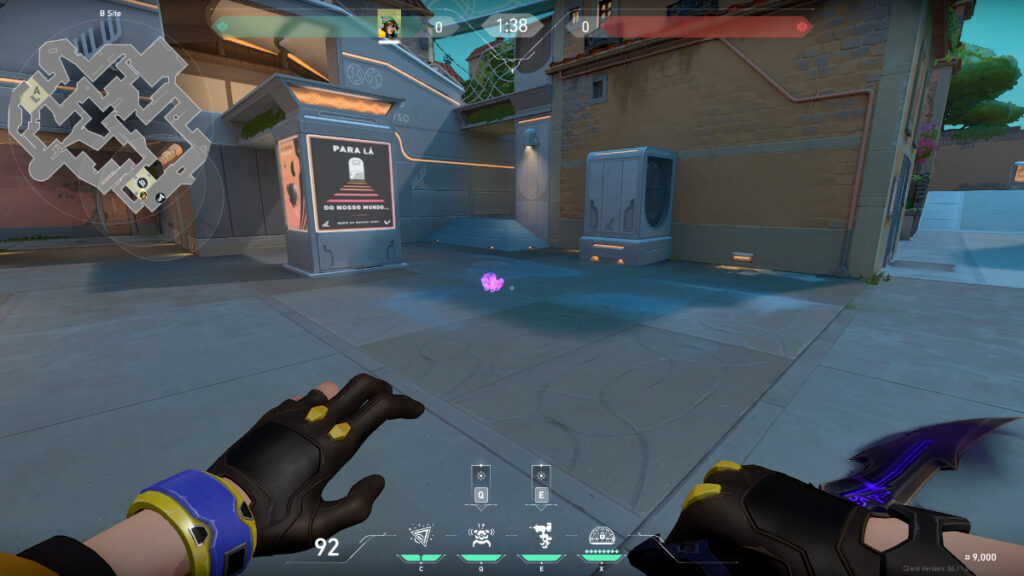 Image via Riot Games
For some unpredictability, think about moving your Alarm Bot slightly nearer to the site after playing several rounds. This way, enemies will struggle more with spotting it early on in gameplay. As another option with improved obscurity, you can situate the bot behind an adjacent corner next to the wall next as well.
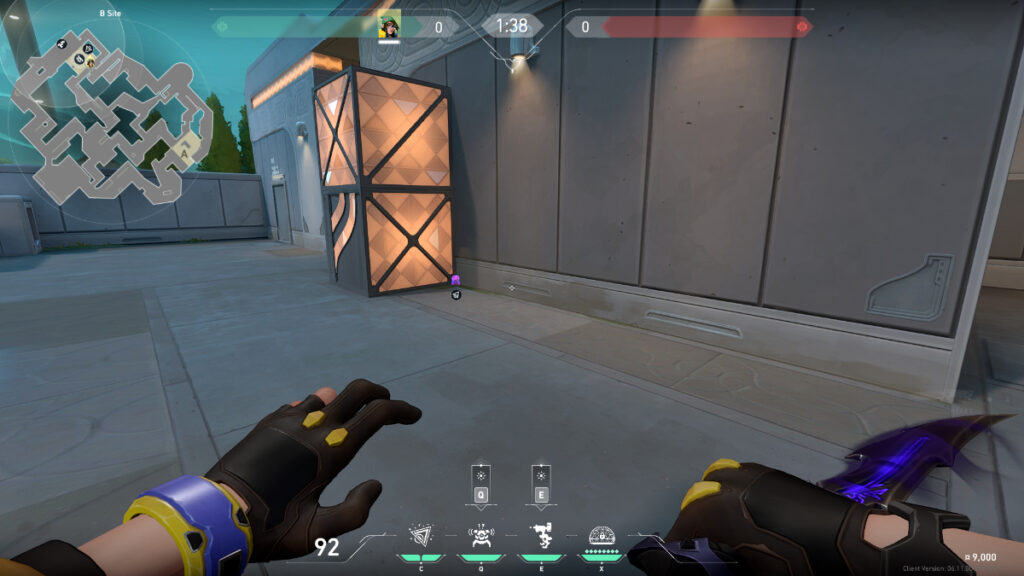 Image via Riot Games
If you suspect the enemy might plant in this area or if you’ve already planted and want to prevent defenders from defusing, consider placing your Swarm Grenade behind the orange boxes (assuming the Spike is planted on the other side).
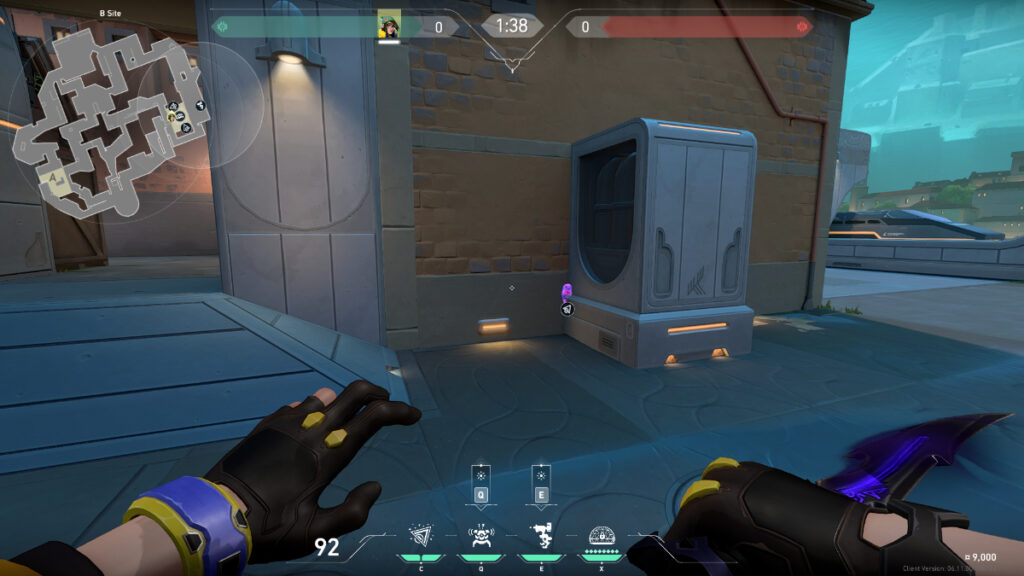 Image via Riot Games
If you suspect the enemy might plant near the white generator, you can use a sneaky Swarm Grenade setup. Simply throw it behind the corner, hiding it from enemy sight. For an even more concealed placement, throw it on top of the base of the white generator. This tactic can also be useful during post-plant situations on the attacking side. When the grenade detonates, it will prevent anyone from planting or defusing the Spike. This setup will deny the plant at two commonly used spots and detect the enemy early in the round.
With her defensive prowess, Killjoy is an excellent agent for any Valorant player looking to seize strategic opportunities on the Pearl map with her setups. Her abilities can create impenetrable defenses that give your team an edge when used correctly. To obtain peak performance when using Killjoy on Sites A and B on Pearl, learning the setups mentioned above is vital.
Effective gadget placement backed by proactive usage can pave the way for success with Killjoy on Pearl map in Valorant. Agility in reconfiguring setups according to shifting gameplay dynamics, as well as communication with teammates during attack and defense operations, can fundamentally elevate outcomes for players dedicated to their role as guardians.